Why document before a move
Moving companies occasionally damage or misplace things, even good ones. If something goes wrong, a moving claim works a lot like an insurance claim: you need to show what you had and what it was worth. Without a record made beforehand, you're left trying to prove a loss from memory.
You're already handling almost everything you own as you pack, so turning that into a record costs very little extra. By the time the truck pulls away, you want to be able to answer three questions: what's in this box, where did it go, and if it never shows up, what was it worth?
A few habits for the boxes
- Give every box a number and a room. "Kitchen #1," "Kitchen #2," "Bedroom #1." Write it on the top and on at least two sides, so you can read it however the boxes are stacked.
- Keep the valuable details off the cardboard. A label that says "Kitchen #3" tells a stranger nothing. A label that says "laptop and jewelry" tells them exactly which box to grab. Keep those details in your record instead.
- Keep the record somewhere that isn't in the truck. Cloud storage means it survives the move even if a laptop or a notebook doesn't.
Way one: let the box be the item
This is the simplest approach, and it's quick enough to do while you tape.
- Pick the room the box belongs to in Homvi.
- Add an item by hand. Name it with the box number and a few words about what's inside, for example "Kitchen #1: pots, pans, baking sheets." Putting the useful words in the name means they show up everywhere your inventory does.
- Attach a photo of the sealed box with its label showing.
- Use the description for the longer list of what's inside and enter a rough value for the box as a whole.
Now each box is one entry in your inventory. Search works across names and descriptions, so if you can't remember where you packed the stand mixer, typing "mixer" finds the box.
Worth knowing: you type the contents yourself, so the value is your own rough number for the whole box, not a price for each thing inside. The full PDF lists each item's name, so keep the key words in the name, not only in the description.
Way two: scan your things before they go in the box
If you would rather let the AI do the listing, treat each box like its own little room. The trick is to photograph the items before they're packed, because things stacked inside a box hide each other and the AI can only list what it can see.
- Add a custom room and name it to match the box, with "Moving" in front: "Moving Kitchen #1." The prefix keeps your box rooms apart from your real Kitchen, and it makes them easy to spot in the room list.
- Gather what's going into that box and spread it out on a counter, table, or floor so nothing sits on top of anything else.
- Photograph it into the "Moving Kitchen #1" room. Homvi lists up to 10 items per photo and a room holds up to four photos, so a full box may take two or three shots.
- Check the list. Like items are grouped into one entry with a count, so eight mugs come back as something like "Coffee Mugs (set of 8)" rather than eight separate lines. Each entry has an estimated value; fix any name or value that looks off and tick the ones you want to keep.
- Now pack everything into the box, label it "Kitchen #1," and move on to the next one.
You end up with an item-by-item list for every box, with values and photos, and very little typing. It also makes you look at everything you own one more time before it goes into cardboard, which is a handy moment to decide what's not coming with you.
Already have your home in Homvi?
You don't have to start over. Make a box room like "Moving Kitchen #1," then open the room those things are in now. Tap Select, check everything going in the box, tap Move and pick the box room. Their photos, values and details go with them.
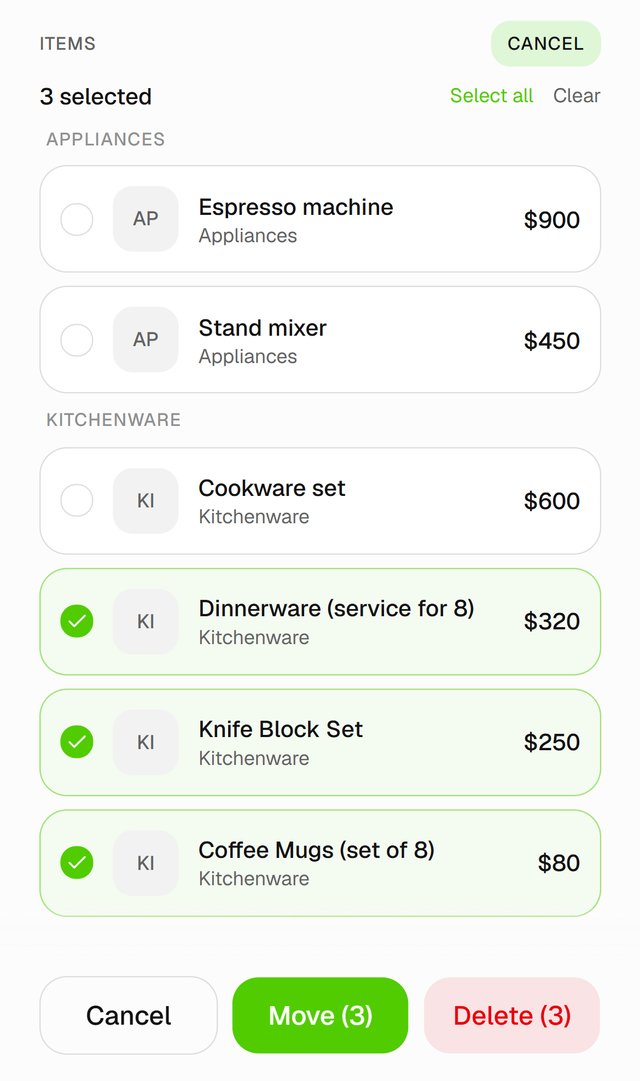
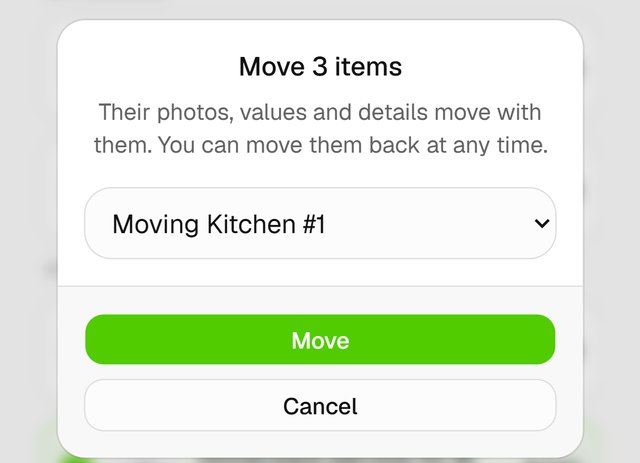
At the new place, do the same in reverse: open the box room, select everything and move it into your new Kitchen. Once a box room is empty, you can delete it.
Mix and match
Nothing says you have to choose one. You could make quick box entries for most boxes and save the full scan for the ones that matter most: electronics, documents, or anything hard to replace.
When the truck arrives
Check boxes off as they come off the truck. If one is missing or something arrives damaged, you have photos, a list of what was in the box, and a value for each item, instead of a guess. Every moving company handles claims a little differently, so it's worth asking yours how it works before moving day. Either way, a record you made beforehand makes the conversation easier.
What Homvi is, and isn't, for a move
Homvi isn't a box tracker. It doesn't print QR labels or run a loading checklist. What it does is give you a photo-backed record of what you own and what it's worth and a PDF you can hand to someone if you ever need to. If you want scan-to-find labels, a dedicated box-tracking app can do that, and it can sit alongside Homvi without any conflict.
A few minutes of documenting before the tape comes out is far easier than trying to remember afterward. For why it's worth doing beyond moving day, see the fastest way to document what you own.